Thursday, 8 October 2015
Ben & Almira Wedding Video
I have been abandoning this blog for a while now. I did not realize my last post was 2013. I am not a fan of "blogging" really, I started this blog for the sake of giving out information on how Invisalign works, thus its former title as "My Invisalign Diaries". However, its not just having my teeth aligned right. Its about my life. So, I might as well go ahead with this blog right? By the way, if you must know, I am still on Invisalign. I am at my 2nd Refinement Stage. Will keep updates on that later on.
So this is now a blog of my journey to LIFE. So let me share so far, my BEST achievement. I got married to the man of my dreams! True Love. My One Great Love. 6 Months married to my perfect man, and my thoughts are still floating to that special day. Please allow me to share our wedding video edited on the same day. I can play this all day.
Shout out to all the Newly Weds out there, Congratulations! This is our road to LIFE.
Thursday, 27 June 2013
Maths on my Invisalign Part 2
As promised, here's the next set of measurements, this time while Im on my Aligner #16. You can find the attachments sticking out from my study models here..
First Photo:
My Upper and Lower Study Models at Aligner #16.

Second Photo:
My Upper Model showing the Arch Length, Arch Perimeter and Intermolar Width at Aligner #16

Third Photo:
My Lower Model showing the Arch Length, Arch Perimeter and Intermolar Width at Aligner #16

Fourth Photo:
My Upper and Lower Models biting together on the Right Side View showing my Overjet at Aligner # 16
Fifth Photo:
My Upper and Lower Models biting together on Front View showing the Midline Shift at Aligner #16

So here's my new Measurments:
From Photo #2:
Upper Arch Length: 31mm
Upper Arch Perimeter: 81mm
Upper Intermolar Width: 47mm
From Photo #3:
Lower Arch Length: 26mm
Lower Arch Perimeter: 69mm
Lower Intermolar Width: 43mm
From Photo #4:
Overjet: 7mm
From Photo #5:
Midline Shift to Right from the Upper : 3mm
Midline Shift to Left from the Lower: 3mm
Upper Arch Length - Lower Arch Length = Overjet including all teeth
31mm - 26mm = 5mm
So what do these numbers stand for??
1. My Upper Jaw has been expanding to accomodate my teeth and to relieve the crowding. (79mm to 81mm by 2mm) This means that from a tapered "U" or somewhat "V" shaped Upper Arch, my Upper Jaw is slowly being transformed to a nice "U" shape.
2. My Lower Jaw is doing the opposite. It has been contracting because it was previously flared out. (71mm to 69mm by 2mm)
3. My overjet or my "jotting" out front teeth retracted by 3mm! Now, that is a huge difference! (from 9mm to 3mm). So when you look at my photos, my two front teeth doesn't look like Bugs Bunny Teeth Anymore.
4. My Upper Jaw's length has tremendously changed as to its length from 43mm to 31mm!! That's 12mm difference! Major improvements are seen from my Upper Jaw
5. My Lower Jaw doesn't show very much significant differences since there's only 1-2mm changes. I guess, I really do not have much issues with it anyway..
6. My Upper and Lower midline is slowly coping to meet each other at the center. Especially my the shift to the Left which started at 5mm and now to 3mm!
These are my own calculations and this just to share with you how impressive Invisalign can be not just visibly but also through numbers. Till next time.. Can't wait to finally finish and reach my end result!
First Photo:
My Upper and Lower Study Models at Aligner #16.
Second Photo:
My Upper Model showing the Arch Length, Arch Perimeter and Intermolar Width at Aligner #16
Third Photo:
My Lower Model showing the Arch Length, Arch Perimeter and Intermolar Width at Aligner #16
Fourth Photo:
My Upper and Lower Models biting together on the Right Side View showing my Overjet at Aligner # 16
Fifth Photo:
My Upper and Lower Models biting together on Front View showing the Midline Shift at Aligner #16
So here's my new Measurments:
From Photo #2:
Upper Arch Length: 31mm
Upper Arch Perimeter: 81mm
Upper Intermolar Width: 47mm
From Photo #3:
Lower Arch Length: 26mm
Lower Arch Perimeter: 69mm
Lower Intermolar Width: 43mm
From Photo #4:
Overjet: 7mm
From Photo #5:
Midline Shift to Right from the Upper : 3mm
Midline Shift to Left from the Lower: 3mm
Upper Arch Length - Lower Arch Length = Overjet including all teeth
31mm - 26mm = 5mm
So what do these numbers stand for??
1. My Upper Jaw has been expanding to accomodate my teeth and to relieve the crowding. (79mm to 81mm by 2mm) This means that from a tapered "U" or somewhat "V" shaped Upper Arch, my Upper Jaw is slowly being transformed to a nice "U" shape.
2. My Lower Jaw is doing the opposite. It has been contracting because it was previously flared out. (71mm to 69mm by 2mm)
3. My overjet or my "jotting" out front teeth retracted by 3mm! Now, that is a huge difference! (from 9mm to 3mm). So when you look at my photos, my two front teeth doesn't look like Bugs Bunny Teeth Anymore.
4. My Upper Jaw's length has tremendously changed as to its length from 43mm to 31mm!! That's 12mm difference! Major improvements are seen from my Upper Jaw
5. My Lower Jaw doesn't show very much significant differences since there's only 1-2mm changes. I guess, I really do not have much issues with it anyway..
6. My Upper and Lower midline is slowly coping to meet each other at the center. Especially my the shift to the Left which started at 5mm and now to 3mm!
These are my own calculations and this just to share with you how impressive Invisalign can be not just visibly but also through numbers. Till next time.. Can't wait to finally finish and reach my end result!
Wednesday, 26 June 2013
Let's get into the MATH.
Hello there! For this entry I would like to share my own mathematical computations and measurements on my own study models. Its a bit technical though but, as they say, when you show them the math, there's proof.. So for a quick guide, here's my short glossary of terms:
Disclaimer: I revised a few of the definitions for easier understanding
study models/cast : copy or 3D model of my teeth/dental
impressions
intermolar width: the distance between the midpoint of the first
molars
arch length: the distance formed on the tangent line crossing the
intermolar width and the midline of the central
incisors
arch perimeter: measurement between the mesial aspect of the
first molars over the contact points of posterior
teeth and incisal edge of the anteriors
over bite: vertical overlap of the maxillary teeth over
mandibular teeth measured perpendicular to the
occlusal plane
over jet: the horizontal projection of maxillary teeth beyond the
maxillary teeth measured parallel to the occlusal plane
midline shift: how the midline of the maxillary teeth and
mandibular teeth are deviated to either left or
right in reference to the midline or center of the
face
Oh well, these terms should be enough, lets get straight to the photos and the numbers.
First Photo:
These are my Upper and Lower Study Models.The upper is the left photo and the Lower is the right side. You can easily recognize with the presence of the palate.

Second Photo:
My Upper cast showing how I measured the arch length, arch perimeter and the intermolar width.

Third Photo:
My Lower cast showing how I measured the arch length, arch perimeter and the intermolar width.

Fourth Photo:


Disclaimer: I revised a few of the definitions for easier understanding
study models/cast : copy or 3D model of my teeth/dental
impressions
intermolar width: the distance between the midpoint of the first
molars
arch length: the distance formed on the tangent line crossing the
intermolar width and the midline of the central
incisors
arch perimeter: measurement between the mesial aspect of the
first molars over the contact points of posterior
teeth and incisal edge of the anteriors
over bite: vertical overlap of the maxillary teeth over
mandibular teeth measured perpendicular to the
occlusal plane
over jet: the horizontal projection of maxillary teeth beyond the
maxillary teeth measured parallel to the occlusal plane
midline shift: how the midline of the maxillary teeth and
mandibular teeth are deviated to either left or
right in reference to the midline or center of the
face
Oh well, these terms should be enough, lets get straight to the photos and the numbers.
First Photo:
These are my Upper and Lower Study Models.The upper is the left photo and the Lower is the right side. You can easily recognize with the presence of the palate.
My Upper cast showing how I measured the arch length, arch perimeter and the intermolar width.
Third Photo:
My Lower cast showing how I measured the arch length, arch perimeter and the intermolar width.
Fourth Photo:
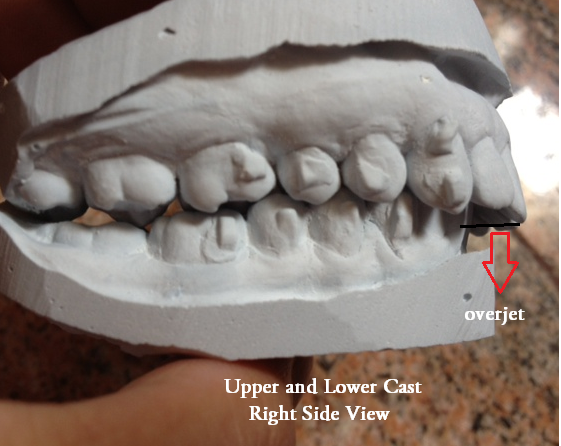
My Upper and Lower Cast biting together, shown on the Right Side View to Measure my Overjet
Fifth Photo:
My Upper and Lower Cast biting together shown on Front View to show the Midline
Here are my Measurements BEFORE TREATMENT:
From Photo #2:
Upper Arch Length: 43mm
Upper Arch Perimeter: 79mm
Upper Intermolar Width: 46mm
From Photo #3:
Lower Arch Length: 27mm
Lower Arch Perimeter: 71mm
Lower Intermolar Width: 41mm
From Photo #4:
Overjet: 9mm
From Photo #5:
Midline Shift to the Right from the Upper : 2mm
Midline Shift to the Left from the Lower: 5mm
Upper Arch Length - Lower Arch Length = Overjet including all teeth in measurement
43mm - 27mm = 16mm
We have quite a significant number here.. My teeth, no doubt doesn't look THAT much crooked, but in terms of balance and symmetry, there really is a big difference.
Remember these measurements for now and I will show you the update measurements while Im On Treatment on my next post.
Thursday, 13 June 2013
Pic Collage Update on my Aligners
Yeah, I know I should include in more photos of my progress.. So thanks to the App Pic Collage, I made comparisons of my progress. Forgive mo for some blurry photos due to it was taken from IPhone 4S "selfie" shots..
January 2013 (3 months after)

February 2013 (4 months after)
Notice the change in my face shape. Im not too sure if this is due to my losing weight or my Invisalign Treatment or combined.

14 February 2013, Valentines Day!
I received surprise roses delivered at work from my boyfriend, Ben. I know you don't need to see that, but I posted this to show you the huge change in my face. Did I slim down? Or do I look so tired?

March 2013 (5 months later)
Well I guess, a change in lipstick shade also does the trick? Hehe.. My first attempt in trying out a red.
Notice my sharp right canine crossing over my lip on my before photo. Did my mouth and lips suddenly get wide or what? Haha.. That is what we call maxillary expansion..

April 2013 (6 months later)
I can see more teeth showing on the corners of my mouth. Do you see the black corners on the before photo? And after, there's more teeth instead of space.

May 2013 (7 months later)
Say hello to that new smile! I love it! Did my smile look prettier or what? Can't wait to finally reach the end!

January 2013 (3 months after)
February 2013 (4 months after)
Notice the change in my face shape. Im not too sure if this is due to my losing weight or my Invisalign Treatment or combined.
14 February 2013, Valentines Day!
I received surprise roses delivered at work from my boyfriend, Ben. I know you don't need to see that, but I posted this to show you the huge change in my face. Did I slim down? Or do I look so tired?
March 2013 (5 months later)
Well I guess, a change in lipstick shade also does the trick? Hehe.. My first attempt in trying out a red.
Notice my sharp right canine crossing over my lip on my before photo. Did my mouth and lips suddenly get wide or what? Haha.. That is what we call maxillary expansion..
April 2013 (6 months later)
I can see more teeth showing on the corners of my mouth. Do you see the black corners on the before photo? And after, there's more teeth instead of space.
May 2013 (7 months later)
Say hello to that new smile! I love it! Did my smile look prettier or what? Can't wait to finally reach the end!
Aligner #5 Happy Holidays!
26 December 2012, Wednesday
Christmas
was a blast! Besides the fact that I was divulging myself to sumptuous food
everyday for the holiday season, I spent my first Christmas with my boyfriend!
I am soo happy!
What’s
great is that I have gotten used to wearing my aligners and it didn’t posed any
hindrance for me to enjoy my Holiday meals! My friends don’t seem to be
disgusted to me anymore everytime I take out my aligners. (Yup! I know its not
very proper manners – I have to go to the restroom to take it out so other people
need not see my saliva drools.) But it is such a hassle to go to the restroom
everytime just to take out my aligners. So, I just take it out just before
meals are served. And this doesn’t bother people anymore – as a matter of fact,
they seem to be more interested what the heck am I doing. And when I dine out
and I bring my box, they look at it closely! Now that is an indirect
advertising! But, after meals, I really have to take a bathroom break to wash
my mouth, wash the aligners and put it back. I feel so vain – in a good way.
In
instances that I don’t have my Invisalign box in my bag, and I dine out, I put
it on a tissue paper, BUT, I DO NOT WRAP IT. Yeah, I know its gross, it can be
unhygienic, whatever! My friends don’t mind it anyway. By that way, its safe! I
leave it exposed for me to see and for my friends to see it, so in case I
forget to take it back, they will see it and they will remind me to put it back
on! I would rather be gross for that moment, rather than lose it and waste my
money! Am I right?
Here's a shot of my romantic Christmas dinner date! Happy Holidays everyone!

Wednesday, 12 June 2013
Aligner #2, Attachments and Elastics
06 November 2012, Tuesday
Today,
was a long dental appointment, its time for my attachments.
Hmm.. I wonder
how it feels?? Well, it felt rough. There is something attached to my teeth,
not all but most of it, especially near the back. It feels the same like the braces
before, when I had my brackets on, you know there is something sticking out and
it’s not smooth.
Then, the challenge comes in, I had to fit my 2nd
aligner. Oh, boy it is indeed a challenge! It is pretty TOUGH! It will really
take time and practice to be able to adapt to the taking out and putting in.
Plus! I need to put elastic bands on my upper and lower teeth. I remember this
white packets that I need to hook to my braces before. It was exactly the same.
There was a hook on my lower aligner on my first molars and there is a tooth-coloured button on my
2 upper canines, so I hook it on my Upper Canine to the hook on the aligner of my
Lower Molar. It’s the same for both the right and the left.
So, now, I really
feel like going through braces all over again… but more stylish and classy!
Haha.. Although now, the pressure is even more! I can feel that my teeth are
actually moving slowly, one tiny step at a time. It’s good, because I know it
works, but in a way weird because I can really feel something peculiar happening in
my teeth. But, as the saying goes… No pain, no gain! Till the next aligner!
Here's a shot of me.

Dental Appointments Starts from Here
Erratum: I started on my Invisalign Treatment in October 21, 2012. I just happen to keep all my notes in my computer and wasn't brave enough to "blog" about it online.. So for better understanding of the time frame, please refer to the actual dates on my blog entries. Thank you!
21 October 2012, Sunday
This
is it! I finally got my first set of aligners! (vocab: Its the transparent
retainer-like material that I am going to wear that will get my teeth straight.)
To start on the treatment you will be needing the following dental appointments:
1. Consultation and assesment of your case. This visit includes the taking of:
- radiographs - Panoramic X-ray and Lateral Cephalogram
- study models - with alginate (soft dental impression material) - a model of my teeth
- rubber impression - with PVS (rubber impression material) - the accurate mold of my teeth
- photographs
2. Clincheck appointment - the virtual simulation of my teeth which will show my teeth transformation from crooked to finally the perfect straight one. (This is like wow! Really? Im gonna look like that?) Quite a state of the art I must say.
3. Invisalign Aligner Issue
For my case, I have 31 sets of aligners. My #1 happens to have no attachments (vocab: The tooth-coloured tiny squares that they will be bonded to the teeth to anchor the aligners) So I can just easily put it on. This will now give me the feel of how it is.
I need to wear the aligners for almost 22 hours a day (vocab: the only opportunity I can take it out is
during eating!!) Wow! This really needs a lot of compliance. I must say, you
must really, really like to achieve your
goal and get your money’s worth and comply as instructed.
So
then, I did put it on, it was quite easy to put in, but I can feel pressure and
there’s a weird feeling all over my mouth.
1) It feels like all my teeth
has this something that pushes it
constantly
2) There is a glossy smooth
thing covering all over my teeth. It can get pretty overwhelming on the first
time I put it on, but as my day goes by with it, I adapt easily.
Although
there is one drawback, you have to be very cautious everytime you would like to
eat, you have to take it out, and boy, whenever I take it out there’s a pool of
saliva on my aligners! (It’s kinda gross, but it actually makes me want to
brush my teeth more!) Now I need to
adapt to a new routine. Before eating, take it out, rinse it. After eating,
brush my teeth, brush my aligners and put it back. But I think, I’m gonna be
fine with it!
Subscribe to:
Comments (Atom)